
On this tutorial, we’ll be making a decentralized chat app with React, CSS, and GunJs. It needs to be famous that you’ve the choice of including extra options and kinds.
We’ll be constructing one thing much like this 👇

Why a Decentralized Chat App?
First, allow us to outline decentralization.
In a decentralized system, knowledge is not saved in a single central level or location. As a substitute, copies of stated knowledge are distributed to a number of members, implying that no single authority controls such data.
So principally, decentralization eliminates the idea of 1 entity having management over an asset or particular property saved in a central location.
Some messaging platforms at this time can learn our messages in the event that they’re not encrypted end-to-end. Who’re we to argue with messaging apps that declare to be safe? On the plus facet, some are extremely secure, and our conversations stay non-public and safe.
A decentralized chat app is safer and safeguards person privateness. This provides such apps a big benefit over some commonplace messaging platforms.
Our Intention
On this article, we’ll use ReactJs as our front-end framework, CSS for styling, and GunJs for decentralization.
GunJs permits us to retailer knowledge with none exterior servers or databases. GunJS is a decentralized database that holds knowledge and distributes it throughout a community of friends/computer systems. Every laptop might have a whole or a portion of the particular knowledge. The GunJs database might be outlined as the complete knowledge saved on the community’s nodes.
As a substitute of writing a program to handle a decentralized data storage system ourselves, GunJs simplifies it with its easy syntax.
Conditions
- It’s essential to have Node.js put in. You’ll be able to obtain the newest model here.
- create-react-app. That is what we’ll use to create our React app. You’ll be able to set up it by working
npm i -g create-react-apporyarn add -g create-react-appin your terminal. - Primary JavaScript and React information.
- Primary CSS information.
The Server
Create a folder gun-server and initialize the package deal.json file:
mkdir gun-server
cd gun-server
npm init --y
We’ll want categorical and gun for the server. Run this command to put in the packages in our mission listing:
yarn add gun categorical
When you’re utilizing npm, you need to run the next:
npm set up gun categorical
Creating the server
Within the gun-server folder, create a file known as index.js. This file will comprise the server code. It would solely take about 20 strains of code:
const categorical = require('categorical')
const app = categorical()
const port = 5050
const Gun = require('gun')

app.use(Gun.serve)

const server = app.pay attention(port, () => {
  console.log(`Gun server working on port ${port}🔥`)
})

Gun({ net: server })
That is it for our server. To start out the server, run npm begin or yarn begin in your terminal in the identical listing because the server’s information.
The Frontend
Create a React app titled gun-client. To create the app, run the next code within the terminal:
npx create-react-app gun-consumer
cd gun-consumer
npm set up gun @faker-js/faker
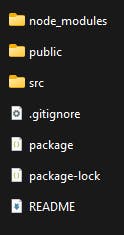
This could generate a React app with the usual React boilerplate code and folder construction. Your mission folder ought to appear like this:
Now run npm begin to begin the app in your browser.
Frontend Packages
- GunJs
- Faker.js: It is a JavaScript library that generates random person data like first identify, final identify, profile picture, and so on. Because the sender’s username, we’ll use Faker.js to generate a random username that’ll be hooked up to every message. If you launch the app, it can save you this identify in native or session storage to make sure that every message has the identical username. You can too ask the person for his or her identify.
GunJs configuration
Import and initialize the Gun library in src/App.js and the required React hooks for our mission:
import './App.css'
import { useEffect, useState, useReducer } from 'react'
import Gun from 'gun'
import faker from '@faker-js/faker'


const gun = Gun({
  friends: [
    'http://localhost:5050/gun'
  ]
})


const currentState = {
  messages: []
}


const reducer = (state, message) => {
  return {
    messages: [message, ...state.messages]
  }
}

operate App() {
  const [messageText, setMessageText] = useState('')
  const [state, dispatch] = useReducer(reducer, currentState)


  useEffect(() => {

  }, [])


  const sendMessage = () => { }

  return <div className="App">
    <predominant>
      <div className='messages'>
        <ul>
          <li className='message'>
            <img alt='avatar' src='https://res.cloudinary.com/follio/picture/add/v1650729202/vhophm5tpnlyaj2h6snf.png' />
            <div>
              Hey there y'all 👋
              <span>Langford</span>
            </div>
          </li>
        </ul>
      </div>
      <div className='input-box'>
        <enter placeholder='Sort a message...' />
        <button>Ship</button>
      </div>
    </predominant>
  </div>
}

export default App
Styling
You might be as inventive as you need and introduce as many kinds as attainable, however for the sake of simplicity, we’re utilizing fundamental CSS kinds on this tutorial. Open the src/index.css file to fashion the app and duplicate the code beneath:
* {
  padding: 0;
  margin: 0;
  list-style-type: none;
  font-family: -apple-system, BlinkMacSystemFont, 'Segoe UI', Roboto, Oxygen, Ubuntu, Cantarell, 'Open Sans', 'Helvetica Neue', sans-serif
}

predominant {
  max-width: 700px;
  margin: auto;
  top: 100vh;
}

.input-box {
  show: flex;
  align-items: heart;
  place: fastened;
  backside: 0;
  padding: 10px 0;
  width: 100%;
  max-width: 700px;
}

enter {
  width: 100%;
  border: 2px stable #f1f1f1;
  padding: 10px;
  background: #f1f1f1;
  define: none;
  border-radius: 10px;
}

button {
  padding: 10px;
  width: 30%;
  border: none;
  background: #016fff;
  border-radius: 10px;
  margin-left: 5px;
  shade: #fff;
  cursor: pointer;
}

button:hover {
  opacity: .5;
}

.message {
  background: #f1f1f1;
  margin: 10px 3px;
  margin-left: 0;
  border-radius: 10px;
  padding: 10px;
  text-align: left;
  width: max-content;
  show: flex;
}

.messages>ul {
  padding-bottom: 100px;
}

.message>img {
  background: #fff;
  width: 30px;
  top: 30px;
  object-fit: comprise;
  border-radius: 9999px;
  margin-right: 10px;
}

.message>div span {
  opacity: .3;
  show: block;
  font-size: small;
}

.message>div {
  show: flex;
  flex-direction: column;
}
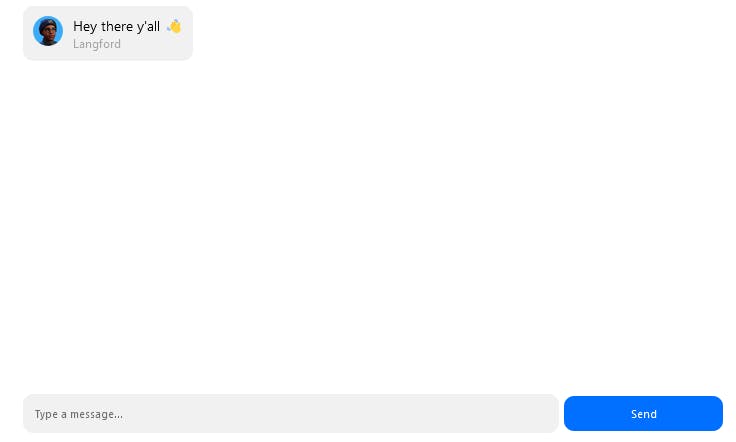
If you view the app in your browser, you need to see one thing like this:
Dealing with Person Interplay
Within the useEffect hook, add this code:
useEffect(() => {
    const messagesRef = gun.get('MESSAGES')
    messagesRef.map().on(m => {
      dispatch({
        identify: m.identify,
        avatar: m.avatar,
        content material: m.content material,
        timestamp: m.timestamp
      })
    })
  }, [])
Any code within the useEffect hook is executed as quickly because the web page is loaded. In our case, we wish to retrieve the messages as quickly because the web page hundreds. Then, we’ll put it aside to our messages array and show it within the frontend.
Exchange the frontend JSX code with the code beneath:
return <div className="App">
    <predominant>
      <div className='messages'>
        <ul>
          {state.messages.map((msg, index) => [
            <li key={index} className='message'>
              <img alt='avatar' src={msg.avatar} />
              <div>
                {msg.content}
                <span>{msg.sender}</span>
              </div>
            </li>
          ])}
        </ul>
      </div>
      <div className='input-box'>
        <enter placeholder='Sort a message...' onChange={e => setMessageText(e.goal.worth)} worth={messageText} />
        <button onClick={sendMessage}>Ship</button>
      </div>
    </predominant>
  </div>
Within the input-box, we added an occasion to maintain monitor of person enter, and executed the operate sendMessage when the “ship” button is clicked.
Additionally, within the ul, we looped via and rendered the messages within the state.messages array variable.
Sending Messages
Earlier than we will ship a message, we should first consult with the chat key, which on this case is MESSAGES. This key represents the present chatroom and acts as a novel identifier for this room. You’ll be able to generate a novel key/id to implement a one-to-one chat function.
Contemplate this chat key to be the identify of a bucket containing all of our messages. You can too take into account the chat rooms to be separate buckets containing completely different units of messages.
Within the sendMessage operate, copy the code beneath:
 const sendMessage = () => {

        const messagesRef = gun.get('MESSAGES')


        const messageObject = {
            sender: faker.identify.firstName(),
            avatar: faker.picture.avatar(),
            content material: messageText,
            timestamp: Date().substring(16, 21)
        }


        messagesRef.set(messageObject)


        setMessageText('')
    }
A Crucial Bug Repair 🐛
Our chat app is now operational, however every message despatched might seem a number of occasions by default. We’ll create a operate, newMessagesArray, that loops via the messages array, removes duplicate messages, and returns a brand new array to deal with this challenge:
  const newMessagesArray = () => {
    const formattedMessages = state.messages.filter((worth, index) => {
      const _value = JSON.stringify(worth)
      return (
        index ===
        state.messages.findIndex(obj => {
          return JSON.stringify(obj) === _value
        })
      )
    })

    return formattedMessages
  }
The Closing Code
We’ve completed constructing our personal decentralized chat app utilizing React and GunJs.
That is the ultimate code for the src/App.js:
import './App.css'
import { useEffect, useState, useReducer } from 'react'
import Gun from 'gun'
import faker from '@faker-js/faker'


const gun = Gun({
  friends: [
    'http://localhost:5050/gun'
  ]
})


const currentState = {
  messages: []
}


const reducer = (state, message) => {
  return {
    messages: [message, ...state.messages]
  }
}

operate App() {
  const [messageText, setMessageText] = useState('')
  const [state, dispatch] = useReducer(reducer, currentState)


  useEffect(() => {
    const messagesRef = gun.get('MESSAGES')
    messagesRef.map().on(m => {
      dispatch({
        sender: m.sender,
        avatar: m.avatar,
        content material: m.content material,
        timestamp: m.timestamp
      })
    })
  }, [])


  const newMessagesArray = () => {
    const formattedMessages = state.messages.filter((worth, index) => {
      const _value = JSON.stringify(worth)
      return (
        index ===
        state.messages.findIndex(obj => {
          return JSON.stringify(obj) === _value
        })
      )
    })

    return formattedMessages
  }


  const sendMessage = () => {

    const messagesRef = gun.get('MESSAGES')


    const messageObject = {
      sender: faker.identify.firstName(),
      avatar: faker.picture.avatar(),
      content material: messageText,
      timestamp: Date().substring(16, 21)
    }


    messagesRef.set(messageObject)


    setMessageText('')
  }


  return <div className="App">
    <predominant>
      <div className='messages'>
        <ul>
          {newMessagesArray().map((msg, index) => [
            <li key={index} className='message'>
              <img alt='avatar' src={msg.avatar} />
              <div>
                {msg.content}
                <span>{msg.sender}</span>
              </div>
            </li>
          ])}
        </ul>
      </div>
      <div className='input-box'>
        <enter placeholder='Sort a message...' onChange={e => setMessageText(e.goal.worth)} worth={messageText} />
        <button onClick={sendMessage}>Ship</button>
      </div>
    </predominant>
  </div>
}

export default App
If you return to http://localhost:3000/ in your most popular browser, you need to see one thing like this:

You’ll be able to host the server on Heroku, or every other server internet hosting platform.
You can too host your React frontend on Vercel, or another React internet hosting platform.
This text is part of the Hashnode Web3 blog, the place a staff of curated writers are bringing out new assets that will help you uncover the universe of web3. Examine us out for extra on NFTs, DAOs, blockchains, and the decentralized future.


