
One of many major options of decentralized functions (DApps) is the power to attach a pockets, which in flip permits the consumer to work together with transactions on the DApp. It abstracts functionalities like switching networks, offering signers, and different options that present customers with a type of authentication. Connecting a pockets additionally acts as a gateway that enables customers to make and skim actions on the blockchain by way of the DApp, utilizing their pockets handle as a licensed identification.
WalletConnect is a free and open supply protocol that makes it potential to attach our DApps to a number of wallets, together with MetaMask, Belief Pockets, Rainbow, and others. This protocol abstracts this course of by establishing a connection between the DApp and the pockets, retaining them in sync all through the session.
On this article, we’ll use WalletConnect to hyperlink our pockets app to our DApp, utilizing Vue.js on the entrance finish. One factor to notice is that WalletConnect can be utilized on any DApp, chain, and pockets (custodial and non-custodial) which can be wallet-connect suitable.
You’ll find the source code for this tutorial here, and a demo of the app we’ll be building here.

Contents
Getting began with a Vue.js app
Firstly, let’s use the Vue CLI to kickstart the challenge. If you have already got Vue CLI put in in your system, you may go on to create the Vue challenge immediately.
You may set up it globally with this command:
npm set up -g @vue/cli
We are able to now use the Vue CLI to create our challenge. Create a brand new challenge utilizing this command:
vue create vue-wallet-connect
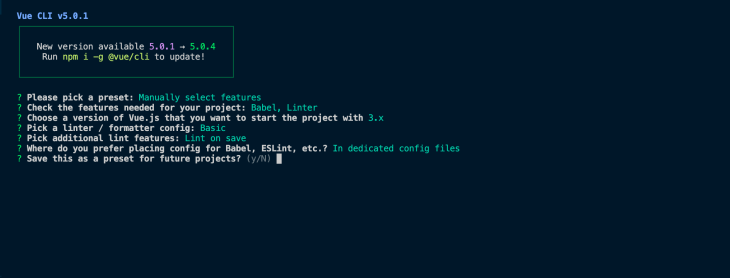
You will have to select a preset. Select Manually choose options, then choose the choices as proven beneath:

After the challenge has been created, navigate to the brand new challenge folder:
cd vue-wallet-connect
We’ll be utilizing Ethers.js in our Vue app to immediately work together with the blockchain whereas connecting our pockets:
npm i ethers
Right here, we set up the WalletConnect library into your challenge:
npm set up --save web3 @walletconnect/web3-provider
Subsequent, to make use of the WalletConnect library immediately in Vue 3, we have to set up node-polyfill-webpack-plugin:
npm i node-polyfill-webpack-plugin
We’re putting in it as a result of our challenge makes use of webpack v5, the place polyfill Node core modules have been eliminated. So, we’re putting in it to entry these modules within the challenge.
Now, open the vue.config.js file and change it with this block of code:
const { defineConfig } = require("@vue/cli-service");
const NodePolyfillPlugin = require("node-polyfill-webpack-plugin");
module.exports = defineConfig({
  transpileDependencies: true,
  configureWebpack: {
    plugins: [new NodePolyfillPlugin()],
    optimization: {
      splitChunks: {
        chunks: "all",
      },
    },
  },
});
As soon as that’s performed now you can begin the server:
npm run serve
Constructing the UI
Let’s go into the parts folder and create a brand new file referred to as StatusContainer.vue. This element accommodates our most important web page.
It it, we have now our welcome message, the Join Pockets button that helps us join, and our Disconnect button to disconnect us from the pockets. Lastly, the Linked button shows once we efficiently connect with a pockets:
<template>
  <div class="hi there">
    <h1>Welcome to Your Vue.js Dapp</h1>
    <div >
       <button class="button">Linked</button>
       <button class="disconnect__button">Disconnect</button>
    </div>

    <button class="button"> Join Pockets</button>
  </div>
</template>
<script>
export default {
  identify: 'StatusContainer'
}
</script>
As soon as that’s performed, open the App.vue file and import the StatusContainer element like so:
<template>
  <status-container/>
</template>
<script>

import StatusContainer from './parts/StatusContainer.vue'
export default {
  identify: 'App',
  parts: {
    StatusContainer
  }
}
</script>
<type>
@import url('https://fonts.googleapis.com/css2?household=Sora:wght@100&show=swap');
#app {
  font-family: 'Sora', sans-serif;
  -webkit-font-smoothing: antialiased;
  -moz-osx-font-smoothing: grayscale;
  text-align: middle;
  shade: #2c3e50;
  margin-top: 60px;
}
.button {
      background-color: #1c82ff;
    border: none;
    shade: #ffffff;
    font-family: "Sora";
    border-radius: 3rem;
    padding: 2rem 3rem;
    font-weight: 600;
    font-size: 2rem;
    margin: 1rem 1rem 1rem auto;
    width: 40%;
}
.disconnect__button {
     background-color: pink;
    border: none;
    shade: #ffffff;
    font-family: "Sora";
    border-radius: 3rem;
    padding: 1rem 1.3rem;
    font-weight: 600;
    font-size: 1rem;
    margin: 8rem 1rem 1rem auto;
    width: 20%;
}
</type>
Inside our type tag, we now add types for the buttons we created earlier: .button and .disconnect__button. Additionally, we import the Sora custom font from Google Fonts and use it as our font-family.
Instantiating WalletConnect
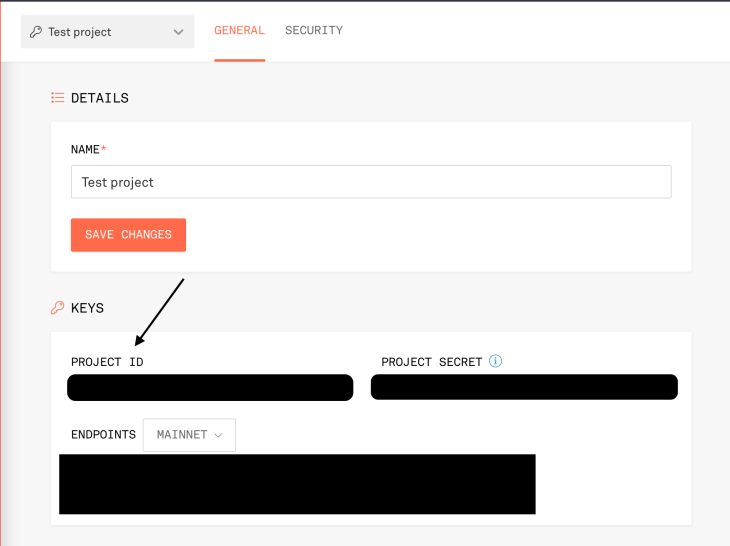
We’ll be needing an RPC supplier to instantiate our WalletConnect library. For this instance, we’ll use Infura. Open Infura, create a brand new challenge, and seize the Mission ID.

Now, create a brand new walletConnect folder beneath the src folder: src/walletConnect. Inside this folder, let’s create a supplier.js file. Right here, we import our WalletConnect library, instantiate it utilizing our Infura ID, and export it to be used in different information.
src/walletConnect/supplier.js will seem like this:
import WalletConnectProvider from "@walletconnect/web3-provider";
export const supplier = new WalletConnectProvider({
  infuraId: course of.env.VUE_APP_INFURA_ID,
});
The Infura ID needs to be used as an environmental variable. So add the next to your .env file:
VUE_APP_INFURA_ID={{INFURA__ID}}
Including performance utilizing composables
After creating our interface and efficiently instantiating our library, the subsequent step is to implement our functionalities. To do that, we’ll use Vue composables, as a result of it permits us to make use of our state and actions in any element inside the app, just like what we have now with Pinia and Vuex.
Making a composable
Contained in the src folder, add src/composables/join. Throughout the join folder, let’s create an index.js file.
Right here, we import reactive and watch, which we’ll use on this file. Let’s create our state object referred to as defaultState:
import { reactive, watch } from "vue";

const defaultState = {
  handle: "",
  chainId: "",
  standing: false,
};

const state = defaultState
In a bid to maintain our state constant, we sync the state with an merchandise within the native storage. Allow us to identify this merchandise "userState" and assign it to a variable referred to as STATE_NAME. That is performed to keep away from making errors when repeating "userState" in a number of locations:
const STATE_NAME = "userState";
We now use watch to replace our native storage as soon as there are any adjustments in our state:
watch(
  () => state,
  () => {
    localStorage.setItem(STATE_NAME, JSON.stringify(state));
  },
  { deep: true }
);
Subsequent, we create a getDefaultState perform that checks if our STATE_NAME merchandise within the native storage exists and assigns the native storage merchandise to the state. If our native storage merchandise doesn’t exist, it assigns the defaultState to state.
Now, we will delete const state = defaultState and use reactive to assign const state = reactive(getDefaultState());:
const getDefaultState = () => {
  if (localStorage.getItem(STATE_NAME) !== null) {
    return JSON.parse(localStorage.getItem(STATE_NAME));
  }
  return defaultState;
};
const state = reactive(getDefaultState());
Lastly, we export our state. We additionally add an if assertion that checks if our native storage merchandise doesn’t exist. If it doesn’t, it creates the merchandise and assigns state to native storage:
 export default () => {
  if (localStorage.getItem(STATE_NAME) === null) {
    localStorage.setItem(STATE_NAME, JSON.stringify(state));
  }
  return {
    state,
  };
};
Now, our state at all times syncs with the native storage, making certain consistency.
Let’s have a look at src/composables/join/index.js:
import { reactive, watch } from "vue";

const defaultState = {
  handle: "",
  chainId: "",
  standing: false,
};

const STATE_NAME = "userState";
const getDefaultState = () => {
  if (localStorage.getItem(STATE_NAME) !== null) {
    return JSON.parse(localStorage.getItem(STATE_NAME));
  }
  return defaultState;
};
const state = reactive(getDefaultState());

watch(
  () => state,
  () => {
    localStorage.setItem(STATE_NAME, JSON.stringify(state));
  },
  { deep: true }
);
export default () => {
  if (localStorage.getItem(STATE_NAME) === null) {
    localStorage.setItem(STATE_NAME, JSON.stringify(state));
  }
  return {
    state,
  };
};
Creating actions
Our actions encompass features that’ll be utilizing in our app. We’ll be creating three features:
connectWalletConnect, which triggers the WalletConnect modal to attach with walletsautoConnect, which handles consistency inside our WalletConnect session after the DApp is related, so when the DApp is related and also you refresh the web page, the consumer’s session remains to be energeticdisconnectWallet, which disconnects the DApp from the pockets and ends the consumer’s session
Let’s soar proper into the code!
connectWalletConnect
Nonetheless inside our join folder (src/composables/join), create the connectWalletConnect file. First, we import our index file, suppliers from ethers, and our supplier that we created earlier in our src/walletConnect/supplier.js file:
import { suppliers } from "ethers";
import join from "./index";
import { supplier } from "../../walletConnect/supplier";

const connectWalletConnect = async () => {
  strive {
    const { state } = join();
    //  Allow session (triggers QR Code modal)
    await supplier.allow();
    const web3Provider = new suppliers.Web3Provider(supplier);
    const signer = await web3Provider.getSigner();
    const handle = await signer.getAddress();
    state.standing = true;
    state.handle = handle;
    state.chainId = await supplier.request({ methodology: "eth_chainId" });

    supplier.on("disconnect", (code, cause) => {
      console.log(code, cause);
      console.log("disconnected");
      state.standing = false;
      state.handle = "";
      localStorage.removeItem("userState");
    });

    supplier.on("accountsChanged", (accounts) => {
       if (accounts.size > 0) {
        state.handle = accounts[0];
      }
    });

    supplier.on("chainChanged", (chainId) => {
      state.chainId = chainId
    });
  } catch (error) {
    console.log(error);
  }
};
export default connectWalletConnect;
Subsequent, we have now a try-catch assertion. Inside our strive assertion, we get our state from join() and pop up our QR modal for connection. As soon as related, we assign our handle and chainId to the state properties and make our state.standing learn true.
We then watch three occasions with the supplier: disconnect, accountsChanged, and chainChainged.
disconnectis triggered as soon as the consumer disconnects immediately from their pocketsaccountsChangedis triggered if the consumer switches accounts of their pockets. If the size of theaccountarray is bigger than zero, we assign ourstate.handleto the primary handle within the array (accounts[0]), which is the present handlechainChaingedis triggered if the consumer switches their chain/community. For instance, in the event that they change their chain from Ethereum mainnet to rinkeby testnet, our utility adjustments thestate.chainIdfrom1to4
Then, our catch assertion merely logs any error to the console.
Return into the index.js file within the join folder and import the connectWalletConnect motion. Right here, we create an actions object and export it with our state:
import { reactive, watch } from "vue";
import connectWalletConnect from "./connectWalletConnect";

const STATE_NAME = "userState";
const defaultState = {
  handle: "",
  chainId: "",
  standing: false,
};
const getDefaultState = () => {
  if (localStorage.getItem(STATE_NAME) !== null) {
    return JSON.parse(localStorage.getItem(STATE_NAME));
  }
  return defaultState;
};
const state = reactive(getDefaultState());
const actions = {
  connectWalletConnect,
};
watch(
  () => state,
  () => {
    localStorage.setItem(STATE_NAME, JSON.stringify(state));
  },
  { deep: true }
);
export default () => {
  if (localStorage.getItem(STATE_NAME) === null) {
    localStorage.setItem(STATE_NAME, JSON.stringify(state));
  }
  return {
    state,
    ...actions,
  };
};
autoConnect
Let’s transfer on to autoConnect.js, and our actions. Just like connectWalletConnect, create an autoConnect.js file. We import the index file and destructure it to get our state and connectWalletConnect utilizing join():
import join from "./index";

const autoConnect = () => {
  const { state, connectWalletConnect } = join();
  if (state.standing) {
    if (localStorage.getItem("walletconnect") == null) {
      console.log("disconnected");
      console.log("disconnected");
      state.standing = false;
      state.handle = "";
      localStorage.removeItem("userState");
    }
    if (localStorage.getItem("walletconnect")) {
      (async () => {
        console.log("begin");
        connectWalletConnect();
      })();
    }
  }
};
export default autoConnect;
One factor it’s best to know is that after WalletConnect has efficiently related to a DApp, all the knowledge regarding that pockets (together with the handle and chain ID) is within the native storage beneath an merchandise referred to as walletconnect. As soon as the session is disconnected, it’s mechanically deleted.
autoConnect checks if our state.standing is true. If that’s the case, we examine if there’s a walletConnect merchandise in native storage. If it’s not within the native storage, we delete all present knowledge in our state and the userState merchandise within the native storage.
Nevertheless, if walletconnect is current in your native storage, we have now an async perform that ”reactivates” that present session for our DApp by firing connectWalletConnect();. So, if we refresh the web page, the connection stays energetic, and might hearken to our supplier occasions.
disconnectWallet
Let’s have a look at our final motion: disconnectWallet. This motion permits us to finish the session from the DApp itself.
First, we import our supplier and state. Then, we use supplier.disconnect(); to disconnect the session, after which we reset the state again to default, and delete the "userState" merchandise in our native storage:
import { supplier } from "../../walletConnect/supplier";
import join from "./index";
const disconnectWallet = async () => {
    const { state } = join();
    await supplier.disconnect();
    state.standing = false;
    state.handle = "";
    localStorage.removeItem("userState");
  }
export default disconnectWallet;
We are able to now return to our src/composables/join/index.js and replace the actions object like so:
const actions = {
  connectWalletConnect,
  autoConnect,
  disconnectWallet
};
Implementing logic in our parts
Let’s open our StatusContainer element and join the logic in our composables to the interface. As traditional, import your composable file and destructure it to get the actions (join and disconnect) and our state:
<script>
import join from '../composables/join/index';
export default {
  identify: 'StatusContainer',
  setup: () => {
    const { connectWalletConnect, disconnectWallet, state } = join();
    const connectUserWallet = async () => {
      await connectWalletConnect();
    };

    const disconnectUser = async() => {
      await disconnectWallet()
    }
    return {
      connectUserWallet,
      disconnectUser,
      state
    }
  }
}
</script>
We then return the features (disconnectUser, connectUserWallet) and state for use within the template:
 <template>
  <div class="hi there">
    <h1>Welcome to Your Vue.js Dapp</h1>
    <div v-if="state.standing">
       <button  @click on="connectUserWallet" class="button">Linked</button>
       <h3>Tackle: {{state.handle}}</h3>
       <h3>ChainId: {{state.chainId}}</h3>
       <button  @click on="disconnectUser" class="disconnect__button">Disconnect</button>
    </div>

    <button v-else @click on="connectUserWallet" class="button"> Join Pockets</button>
  </div>
</template>
First, we use v-if to show issues conditionally, utilizing state.standing. If we’re related and state.standing is true, we show the Linked button, the consumer handle, and chainId. Additionally, we’ll show a Disconnect button that triggers our disconnectUser perform.

If the consumer shouldn’t be related and state.standing is false, we show solely the Join Pockets button that triggers our connectUserWallet perform once we click on.

Including auto join
Let’s go into our App.vue element and add our autoConnect logic to the element. Equally to what we have now performed earlier than, we import our composable and destructure it to get out autoConnect motion. Utilizing Vue’s onMounted, we’ll fireplace the autoConnect() perform. As talked about earlier, this enables us to hearken to reside occasions from the pockets even we refresh the web page:
<script>
import StatusContainer from './parts/StatusContainer.vue'
import join from './composables/join/index';
import {onMounted} from "vue";
export default {
  identify: 'App',
  parts: {
    StatusContainer
  },
  setup: () => {
    const { autoConnect} = join();
     onMounted(async () => {
      await autoConnect()
    })
  }
}
</script>
Conclusion
Congratulations if you happen to made all of it the best way right here! 🎉
On this article, we coated step-by-step particulars on implementing WalletConnect in your Vue DApps. From organising our challenge with the right config and constructing our interface, to writing the required logic to make sure our app is at all times in sync with the pockets.
Expertise your Vue apps precisely how a consumer does
Debugging Vue.js functions may be troublesome, particularly when there are dozens, if not lots of of mutations throughout a consumer session. If you happen to’re inquisitive about monitoring and monitoring Vue mutations for your entire customers in manufacturing, try LogRocket. 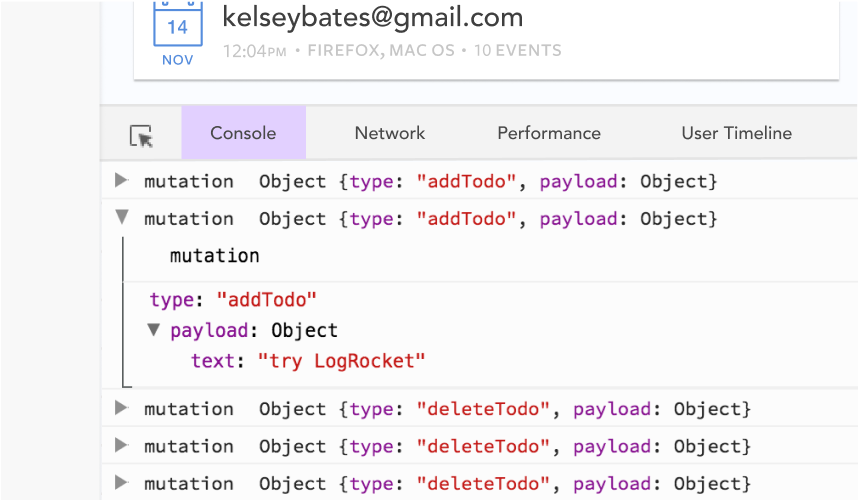 https://logrocket.com/signup/
LogRocket is sort of a DVR for net and cell apps, recording actually the whole lot that occurs in your Vue apps together with community requests, JavaScript errors, efficiency issues, and way more. As an alternative of guessing why issues occur, you may combination and report on what state your utility was in when a difficulty occurred.
The LogRocket Vuex plugin logs Vuex mutations to the LogRocket console, supplying you with context round what led to an error, and what state the appliance was in when a difficulty occurred.
Modernize the way you debug your Vue apps – Start monitoring for free.


